 laravel5.3-第8章-notifyMail
一、下载 laravel 5.3
composer create-project laravel/laravel=5.3.* laravel5.3_notifyMail
新建数据库 laravel5.3_notifyMail
修改 .evn 配置文件
DB_CONNECTION=mysql
DB_HOST=127.0.0.1
DB_PORT=3306
DB_DATABASE=laravel5.3_notifyMail
DB_USERNAME=laravel5.3_notifyMail
DB_PASSWORD=laravel5.3_notifyMail
修改中国时区,在 config/app.php 中修改
'timezone' => 'PRC',
二、创建数据
切换
cd laravle5.3_notifyMail
创建 post model
php artisan make:model Post -m
修改迁移文件:posts_table.php
public function up()
{
    Schema::create('posts', function (Blueprint $table) {
        $table->increments('id');
        $table->string('title');
        $table->string('content');
        $table->timestamps();
    });
}
修改 database/factories/ModelFactory.php
$factory->define(App\Post::class, function (Faker\Generator $faker) {
    return [
        'title' => $faker->sentence,
        'content' => $faker->paragraph,
    ];
});
执行数据迁移
php artisan migrate
创建用户数据
php artisan tinker
factory('App\User', 5)->create();
创建文章数据
factory('App\Post', 5)->create();三、注册 mailtrap.io
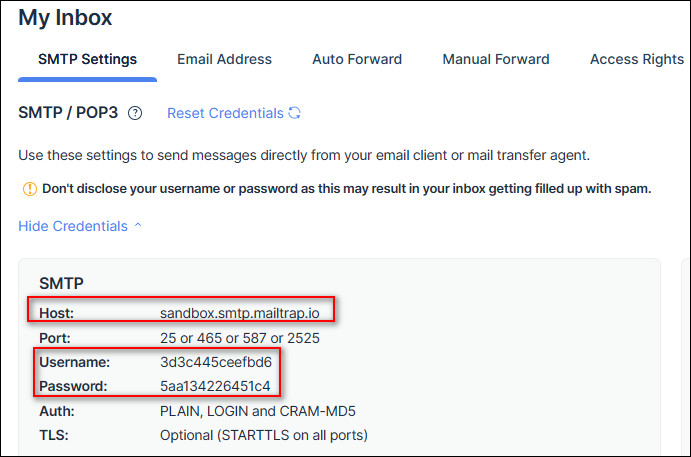
mailtrap.io 是测试邮件发送的工具
注册地址:https://mailtrap.io,注册成功后登录
注意:科学上网速度会快一些
依次点击下图中的链接,找到 Host、Username、Password

修改 .evn 配置文件
MAIL_DRIVER=smtp
MAIL_HOST=sandbox.smtp.mailtrap.io
MAIL_PORT=2525
MAIL_USERNAME=3d3c445ceefbd6
MAIL_PASSWORD=5aa134226451c4
MAIL_ENCRYPTION=null
MAIL_FROM_ADDRESS=alulubin@gmail.com
MAIL_FROM_NAME=lulubin
注意:MAIL_FROM_ADDRESS 和 MAIL_FROM_NAME 分别配置了发送者的邮件地址和名字
四、notification
创建 PostPublished notification
php artisan make:notification PostPublished
修改 routes/web.php
Route::get('/', function () {
    $user = \App\User::find(1);
    $post = \App\Post::find(1);
    $user->notify(new \App\Notifications\PostPublished($post));
});
修改 app/Notifications/PostPublished.php
public $post;

public function __construct(\App\Post $post)
{
    $this->post = $post;
}
启动 serve
php artisan serve
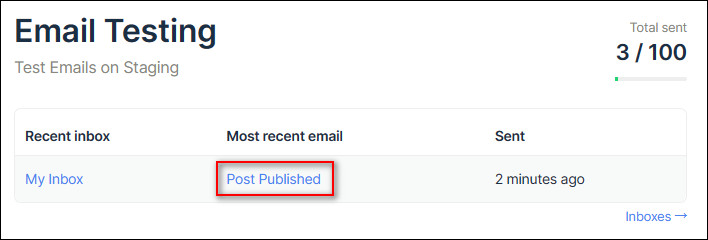
访问 http://localhost:8000 进行发送邮件
打开 https://mailtrap.io/home 查看发送的邮件
五、自定义邮件
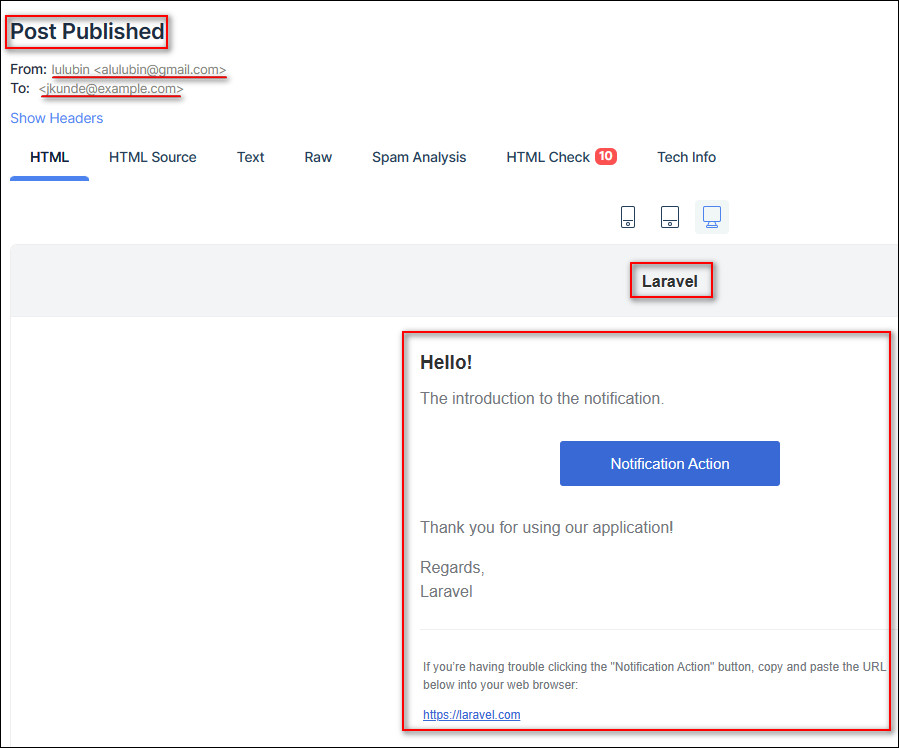
邮件中的“Laravel”对应的是 config/app.php 的 'name'
邮件的内容对应的是 app/Notifications/PostPublished.php 中的 toMail 方法

如果 toMail 方法增加 success(),邮件中的蓝色按钮就会变成绿色按钮
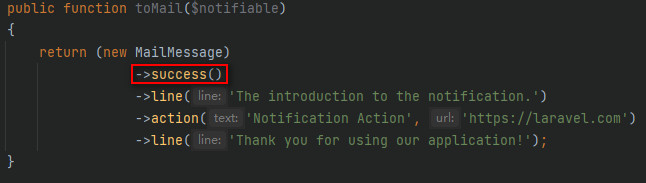
可以给 toMail 方法增加 subject(),邮件的主题就会变化

修改邮件样式
php artisan vendor:publish
此命令会创建以下文件
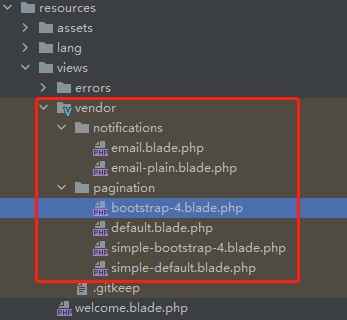
通过修改 resources/views/vendor/notifications/email.blade.php 自定义邮件样式


